Kali Linux Basics - 1

The Linux File-system

The directories you will find most useful are:

• /bin - basic programs (ls, cd, cat, etc.)

• /sbin - system programs (fdisk, mkfs, sysctl, etc)

• /etc - configuration files

• /tmp - temporary files (typically deleted on boot)

• /usr/bin - applications (apt, ncat, nmap, etc.)

• /usr/share - application support and data files

Basic Linux Commands

MAN - Most executable programs intended for the Linux command line provide a formal piece of

documentation often called manual or man pages

Examples

kali@kali:~$ man ls

kali@kali:~$ man passwd

kali@kali:~$ man -k passwd #if we use the -k option with man, we can perform a keyword search as shown below

kali@kali:~$ man -k '^passwd$' #We can further narrow the search with the help of a regular expression


apropos - With the apropos command, we can search the list of man page descriptions for a possible match based on a keyword


kali@kali:~$ apropos passwd             #Note that apropos seems to perform the same function as man -k


Listing Files - The ls command prints out a basic file listing to the screen

kali@kali:~$ ls

kali@kali:~$ ls -al 


Moving Around - We can use the cd command followed by a path to change to the specified directory.The pwd command will print the current directory


kali@kali:~$ pwd

kali@kali:~$ cd /usr/share/


Creating Directories - The mkdir command followed by the name of a directory creates the specified directory.We can create multiple directories at once with the incredibly useful mkdir -p, which will also create any required parent directories.


kali@kali:~$ mkdir sysnet                #creates a directory called sysnet

kali@kali:~$ mkdir -p test/{recon,exploit,report}

kali@kali:~$ ls -1 test/

exploit

recon

report


Finding Files in Kali Linux - 

which - The which command39 searches through the directories that are defined in the $PATH environment variable for a given file name.

kali@kali:~$ which sbd

/usr/bin/sbd


locate - The locate command40 is the quickest way to find the locations of files and directories in Kali.

kali@kali:~$ sudo updatedb                 #To manually update the locate.db database, you can use the updatedb command

kali@kali:~$ locate sbd.exe


find - The find command41 is the most complex and flexible search tool among the three

kali@kali:~$ sudo find / -name sbd*


Enable Services in Kali Linux


SSH Services


kali@kali:~$ sudo systemctl start ssh #To start SSH Services

kali@kali:~$ sudo ss -antlp | grep sshd #To verify SSH Service 

kali@kali:~$ sudo systemctl enable ssh #Enable SSH at boot


HTTP Service

kali@kali:~$ sudo systemctl start apache2 #To start HTTP Services

kali@kali:~$ sudo ss -antlp | grep apache #To verify HTTP Service 

kali@kali:~$ sudo systemctl enable apache2                 #Enable HTTP at boot


Note :

To see a table of all available services, run systemctl with the list-unitfiles option:

kali@kali:~$ systemctl list-unit-files

We can use systemctl to enable and disable most services within Kali Linux.


Searching, Installing, and Removing Tools


apt update - Information regarding APT packages is cached locally to speed up any sort of operation that involves querying the APT database. Therefore, it is always good practice to update the list of available packages, including information related to their versions, descriptions, etc


kali@kali:~$ sudo apt update


apt upgrade - we can upgrade the installed packages and core system to the latest versions using the apt upgrade command.

kali@kali:~$ apt-cache search pure-ftpd                  #The apt-cache search command displays much of the information stored in the internal cached package database


kali@kali:~$ apt show resource-agents


apt install - The apt install command can be used to add a package to the system with apt install followed by the package name

kali@kali:~$ sudo apt install pure-ftpd


apt remove --purge -The apt remove –purge command completely removes packages from Kali

kali@kali:~$ sudo apt remove --purge pure-ftpd                 # we can remove a package with the command apt remove --purge


dpkg

kali@kali:~$ sudo dpkg -i man-db_2.7.0.2-5_amd64.deb                 #dpkg is the core tool used to install a package, either directly or indirectly through APT.

Read More...

Windows Forensics Tools : Densityscout

DensityScout is a tool used for finding (possibly unknown) malware on a potentially infected system. it takes advantage of the typical approach of malware authors to protect their "products" with obfuscation like run-time-packing and -encryption. This tool can be used to scan a desired file-system-path by calculating the density of each file to finally print out an accordingly descending list. Usually most Microsoft Windows executables are not packed or encrypted in any way which throws the hits of malicious executables to the top of the list where one can easily focus on.

Website : https://www.cert.at/en/downloads/software/software-densityscout

How to Use


1. Download software from website : https://www.cert.at/media/files/downloads/software/densityscout/files/densityscout_build_45_windows.zip

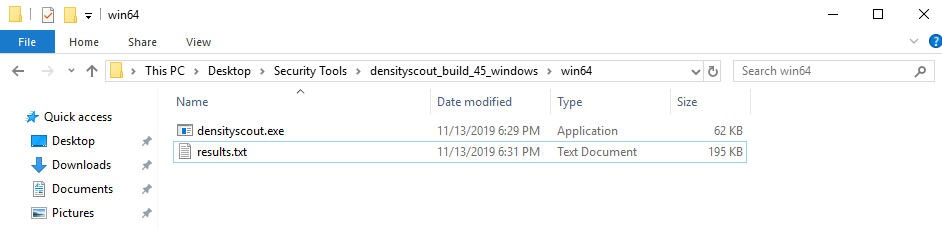
2. Unzip the folder

3. Go to the folder directory where you unzip the files

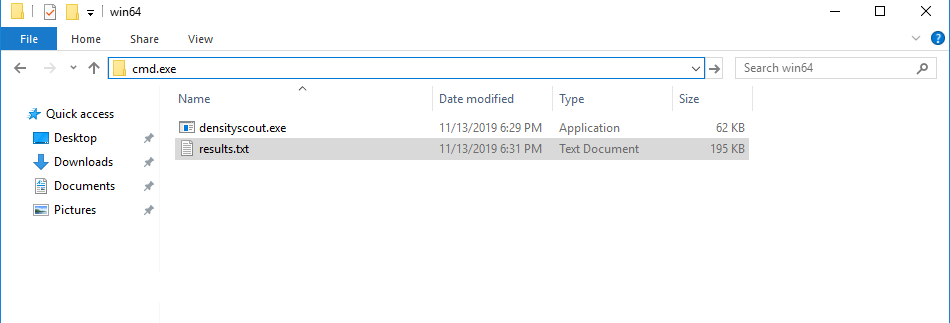
4. Type cmd.exe on the explorer like below and click enter.


5. Type the command on the cmd promt
densityscout -pe -p 0.1 -o results.txt c:\Windows\System32
Using the above command you can scan system32 folder for any "suspicious" file


Output on the cmd promt


Densityscout scan the directory and give you the full result in text file in the folder and show the files which is less than the given density on the command prompt itself


5. You can scan the files using https://www.virustotal.com to check any malicious activity


Read More...

CarbonBlack Protection : How to use Timed Policy Overrides on windows PC

Using Timed Policy Overrides

You might need to install new applications on a selected computer under High Enforcement Level protection. You can do this by temporarily giving the computer permission to execute any files that are not banned by putting to Local approval Policy

When a computer is disconnected from the network it cannot be controlled directly from the Cb Protection Server.By putting those computers in local approval mode, You can generate a special code that can be entered on a agent-managed computer to switch its Enforcement Level for a specified amount of time. The code is specific to one agent, and it can be used only once. .

While especially convenient for disconnected computers, a timed policy override may be used for a connected computer. The override procedures disconnects the agent during the override.

Note:  Use of timed overrides is not recommended for Windows computers that are currently connected to the Cb Protection Server.

To generate a code to place a computer in temporary local approval mode:

1.On the console menu, choose Assets > Computers.

2. Choose the desired computer from the list of computers and click on it.The Computer Details page for that system appears.

3.Click the Policy Override tab in the panel at the bottom of the page. 

4.In the Temporary Policy Override Code panel,leave the default choice for Temporary Enforcement, which is Local Approval.

5.In the Enforcement Level Active For box, enter the number of minutes (up to 500) you want the Enforcement Level change to last.

6.In the Key Valid For box, enter the length of time you want the override code to be valid. Your choice for this field should take into account how long it will take to get the key to the computer user who needs it and how quickly they will be able to enter it.

7.When you have entered all parameters, click the Generate Code button. A code with nine sets of letters separated by dashes appears in the box next to the button.

8.Copy and save the code from the box (and note the computer name) so that you can deliver it to the person who will be installing new software on the offline computer. The code is not saved on the Computer Details page, so you must record it.

The procedure for applying the override code on windows computer

On Windows computers, disconnecting the agent from Cb Protection Server is strongly recommended before initiating an override.

To use a Timed Policy Override code on a Windows computer:

1.On the offline computer, locate and run the program TimedOverride.exe, which is in the Cb Protection Agent installation directory. An authorization dialog box appears.

Note : In windows 7 you can find it under "C:\Program Files (x86)\Bit9\Parity Agent\TimedOverride.exe"

2.Enter the override code for this agent into the dialog box and click OK.

-If the code entered is invalid or expired, or if TimedOverride.exe is unable to communicate with the Cb Protection Agent for any reason, an error message will be displayed. After three invalid attempts, the program automatically closes.

-If a valid code is entered and the Enforcement Level transition is successful, no message is displayed but the dialog box closes.

3.If there was no error code and the dialog box is no longer displayed, you can begin installing the new software needed on this machine (assuming your override code was for Local Approval). The Enforcement Level will return to its original Enforcement Level after the time period configured when the code was generated.
Read More...

Router Commands

 * To jump User mode to privilage mode  :-  Router>enable

 *To jump privilage mode to globel config mode :- Router#configure terminel OR conf t

 *To show ios version :- Router#show version

 *To show flash memory :- Router#Show flash

 *To show startup configuration :-Router#show startup-config

 *To show running configuration :- Router#show running-config

 *To copy running config to startup config :- Router#wr OR copy running-config startup-config

 *To set hostname :-Router(config)#hostname <name>

 *To set enable password :- Router(config)#enable password <word>

To set console password 

Router(config)#line console 0
 Router(config-line)#password <word>
Router(config-line)#login

To erase startup configuration :- write erase OR erase startup-config

To set auxilary password
Router(config)#line aux 0
Router(config-line)#password <word>
Router(config-line)#login

To set an ip address to an interface

Router(config)#interface  <interface name & no.>
Router(config-if)#ip address <ip address> <subnet mask>


ROUTING

 * Static routing

Router(config)#ip route <network addr.> <subnet mask> <nexthop ip addr or exit interface name>

 * Default routing

       Router(config)#ip route 0.0.0.0  0.0.0.0  <nexthop ip addr or exit interface name>

 * Dynamic routing (in the basis of routing protocols)

To configure telnet service
Router(config)#line vty 0 4
Router(config-line)#password <word>
Router(config-line)#login
Router(config-line)#exit
Router(config)#enable password <word>

ACCESS CONTROL LISTS

Standard ACL
         
creating std ACL  :- Router(config)#access-list <listno> <permit/deny> <source ip> <source wildcard mask>
   
apply ACL  :- Router(config)#interface <name & no>
                       Router(config-if)#ip access-group <listno> <in/out>
 
To avoid implicit deny statement :-  Router(config)#access-list <list no>  permit any

Extented ACL
 
creating extd acl :-
         Router(config)#access-list <listno> <permit/deny> <protocol> <sou.ip> <sou. WCM>  <dest ip ><dest WCM>  logic

apply an acl :- Router(config)#interface <interface name & no>
                            Router(config-if)#ip access-group <listno>  in/out

To avoid implict deny statement :- Router(config)#access-list <listno> permit ip any any

Named ACL
Router(config)#ip access-list standard/extented <name/list no.>
Router(config) #permit/deny <protocol> <source ip> <sou WCM> <dest ip> <dest WCM> logic
Router(config) #permit ip any any
Router(config) #ip access-group in/out

NAT

Static NAT
Router(config)#ip nat inside source static <private ip> <public ip>

Dynamic NAT
 Create a pool and assign no of public ip to pool :-                
                                     
Router(config)#ip nat pool <poolname> <start blockip> <end ip> netmask <subnetmask>
                                   
Assign pool to acl

 Router(config)#ip ant inside source list <listno> pool <pool name>

Assign customer and conditions to acl's

Router(config)#access-lists <listno> permit/deny <source ip> <source WCM>


EIGRP

Creating Eigrp :-

Router(config)#router eigrp <AS no>
Router(config-router)#network <connected network address>

To show neighbour table :- Router#show ip eigrp neighbours

To show topology table :- Router#show ip eigrp topology

To show eigrp routing table :- Router#show ip route eigrp

OSPF

Create ospf :- Router(config)#Router ospf <process id>
                        Router(config-router)#network <network addr> <wild cardmask>area <area id>

To show ospf n/w time hello time dead and wait timer ;- Router#show ip ospf  interface <interface name & no.>

To show database table :- Router#show ip ospf database

Read More...

Nexus 7700 License Installation

Below is the steps to install the license

1. Get license file from cisco
2. Copy license file to USB
3. Connect USB to N7K
4. Confirm the license file is issued to correct host-id.
5 .Copy lic file from usb to bootflash
6. Install the file

NOTE : Make sure that the host-id in N7K and license file is same or get new license file from cisco.License only install if they both are same

User Access Verification
SW1-AdminVDC login: admin
Password: *******

Check the current license
SW1-Admin-VDC# show license usage
Feature                      Ins  Lic   Status Expiry Date Comments
                                 Count
--------------------------------------------------------------------------------
MPLS_PKG                      No    -   Unused             -
STORAGE-ENT                   No    -   Unused             -
VDC_LICENSES                  No    0   Unused             Grace expired
FCOE-N7K-F248XP               No    0   Unused             -
ENHANCED_LAYER2_PKG           No    -   Unused             -
TRANSPORT_SERVICES_PKG        No    -   Unused             -
LAN_ENTERPRISE_SERVICES_PKG   Yes   -   Unused Never       -
--------------------------------------------------------------------------------
SW1-AdminVDC# dir usb1:
        393    Jan 08 11:56:54 2018  N770020180108XXXXXXX.zip
        298    Jan 08 04:08:32 2018  N7700201801080XXXXXXX.lic
       4096    Dec 31 11:20:48 2017  N7k run/

SW1-AdminVDC# sh file usb1:N7700201801080XXXXXXX.lic

SERVER this_host ANY
VENDOR cisco
INCREMENT VDC_LICENSES cisco 1.0 permanent 4 \
        VENDOR_STRING=<LIC_SOURCE>MDS_SWIFT</LIC_SOURCE><SKU>N77-VDC1K9=</SKU> \
        HOSTID=VDH=N77-C7710:JPGXXXXXXX \
        NOTICE="<LicFileID>2018010804083XXX</LicFileID><LicLineID>1</LicLineID> \
        <PAK></PAK>" SIGN=DE7FC25XXXX8

SW1-AdminVDC# sh license host-id
License hostid: VDH=N77-C7710:JPGXXXXXXX

SW1-AdminVDC# copy usb1:N7700201801080XXXXXXX.lic bootflash://
Copy progress 100% 298B
Copy complete, now saving to disk (please wait)...

SW1-AdminVDC# install license bootflash:N7700201801080XXXXXXX.lic
Installing license ..............done

SW1-AdminVDC# sh license usage
Feature                      Ins  Lic   Status Expiry Date Comments
                                 Count
--------------------------------------------------------------------------------
MPLS_PKG                      No    -   Unused             -
STORAGE-ENT                   No    -   Unused             -
VDC_LICENSES                  Yes   4   Unused Never       -
FCOE-N7K-F248XP               No    0   Unused             -
ENHANCED_LAYER2_PKG           No    -   Unused             -
TRANSPORT_SERVICES_PKG        No    -   Unused             -
LAN_ENTERPRISE_SERVICES_PKG   Yes   -   Unused Never       -
--------------------------------------------------------------------------------

Read More...