Showing posts with label paloalto. Show all posts

Palo Alto Basics - Traffic Monitor Filtering

 Basics of Traffic Monitor Filtering

Host Traffic Filter Examples

From Host a.a.a.a

         (addr.src in a.a.a.a)

          example: (addr.src in 1.1.1.1) 

          Explanation: shows all traffic from host ip address that matches 1.1.1.1 (addr.src in a.a.a.a) 


To Host b.b.b.b

         (addr.dst in b.b.b.b)

         example: (addr.dst in 2.2.2.2) 

         Explanation: shows all traffic with a destination address of a host that matches 2.2.2.2 


From Host a.a.a.a to Host b.b.b.b

        (addr.src in a.a.a.a) and (addr.dst in b.b.b.b)

        example: (addr.src in 1.1.1.1) and (addr.dst in 2.2.2.2)

        Explanation: shows all traffic coming from a host with an IP address of 1.1.1.1 and going to a host destination address of 2.2.2.2 


To Host Range

        Note that you cannot specify an actual range but can use CIDR notation to specify a network range of addresses

        (addr.src in a.a.a.a/CIDR)

        example:  (addr.src in 10.10.10.2/30)

        Explanation:  shows all traffic coming from addresses ranging from 10.10.10.1 - 10.10.10.3.


To or From Host a.a.a.a

        (addr in a.a.a.a)

        example: (addr in 1.1.1.1) 

        Explanation: shows all traffic with a source OR destination address of a host that matches 1.1.1.1


Zone Traffic Filter Examples: 

From Zone zone_a

        (zone.src eq zone_a)

        example: (zone.src eq PROTECT)

        Explanation: shows all traffic coming from the PROTECT zone 


To Zone zone_b

        (zone.dst eq zone_b)

        example: (zone.dst eq OUTSIDE)

        Explanation: shows all traffic going out the OUTSIDE zone 


From Zone zone_a to Zone zone_b

          (zone.src eq zone_a) and (zone.dst eq zone_b)

          example: (zone.src eq PROTECT) and (zone.dst eq OUTSIDE)

          Explanation: shows all traffic traveling from the PROTECT zone and going out the OUTSIDE zone 


Port Traffic Filter Examples: 

From Port aa

          (port.src eq aa)

          example: (port.src eq 22)

          Explanation: shows all traffic traveling from source port 22 


To Port aa

          (port.dst eq bb)

          example: (port.dst eq 25)

          Explanation: shows all traffic traveling to destination port 25 


From Port aa TO Port bb

          (port.src eq aa) and (port.dst eq bb)

          example: (port.src eq 23459) and (port.dst eq 22)

          Explanation: shows all traffic traveling from source port 23459 and traveling to destination port 22


From All Ports Less Than or Equal To Port aa

          (port.src leq aa)

          example: (port.src leq 22)

          Explanation: shows all traffic traveling from source ports 1-22 


From All Ports Greater Than Or Equal To Port aa

          (port.src geq aa)

          example: (port.src geq 1024)

          Explanation: shows all traffic traveling from source ports 1024 - 65535 


To All Ports Less Than Or Equal To Port aa

         (port.dst leq aa)

         example: (port.dst leq 1024)

         Explanation: shows all traffic traveling to destination ports 1-1024 


To All Ports Greater Than Or Equal To Port aa

          (port.dst geq aa)

          example: (port.dst geq 1024)

          Explanation: shows all traffic traveling to destination ports 1024-65535 


From Port Range aa Through bb

          (port.src geq aa) and (port.src leq bb)

          example: (port.src geq 20) and (port.src leq 53)

          Explanation: shows all traffic traveling from source port range 20-53 


To Port Range aa Through bb

          (port.dst geq aa) and (port.dst leq bb)

          example: (port.dst geq 1024) and (port.dst leq 13002)

          Explanation: shows all traffic traveling to destination ports 1024 - 13002 


Date/Time Traffic Filter Examples:


All Traffic for a Specific Date yyyy/mm/dd And Time hh:mm:ss

         (receive_time eq 'yyyy/mm/dd hh:mm:ss')

         example: (receive_time eq '2015/08/31 08:30:00')

         Explanation: shows all traffic that was received on August 31, 2015 at 8:30am 


All Traffic Received On Or Before The Date yyyy/mm/dd And Time hh:mm:ss

          (receive_time leq 'yyyy/mm/dd hh:mm:ss')

          example: (receive_time leq '2015/08/31 08:30:00')

          Explanation: shows all traffic that was received on or before August 31, 2015 at 8:30am 


All Traffic Received On Or After The Date yyyy/mm/dd And Time hh:mm:ss

          (receive_time geq 'yyyy/mm/dd hh:mm:ss')

          example: (receive_time geq '2015/08/31 08:30:00')

          Explanation: shows all traffic that was received on or after August 31, 2015 at 8:30am 


All Traffic Received Between The Date-Time Range Of yyyy/mm/dd hh:mm:ss and YYYY/MM/DD HH:MM:SS

         (receive_time geq 'yyyy/mm/dd hh:mm:ss') and (receive_time leq 'YYYY/MM/DD HH:MM:SS')

         example: (receive_time geq '2015/08/30 08:30:00') and (receive_time leq '2015/08/31 01:25:00')

         Explanation: shows all traffic that was received between August 30, 2015 8:30am and August 31, 2015 01:25 am 


Interface Traffic Filter Examples:

All Traffic Inbound On Interface ethernet1/x

          (interface.src eq 'ethernet1/x')

          example: (interface.src eq 'ethernet1/2')

          Explanation: shows all traffic that was received on the PA Firewall interface Ethernet 1/2 


All Traffic Outbound On Interface ethernet1/x

          (interface.dst eq 'ethernet1/x')

          example: (interface.dst eq 'ethernet1/5')

          Explanation: shows all traffic that was sent out on the PA Firewall interface Ethernet 1/5 


Allowed/Denied Traffic Filter Examples

All Traffic That Has Been Allowed By The Firewall Rules

         (action eq allow)

          OR

         (action neq deny)

example: (action eq allow)

Explanation: shows all traffic allowed by the firewall rules.  Placing the letter 'n' in front of 'eq' means 'not equal to,' so anything not equal to 'deny' is displayed, which is any allowed traffic. 


All Traffic Denied By The FireWall Rules.

          (action eq deny)

          OR

         (action neq allow)

example: (action eq deny)

Explanation: shows all traffic denied by the firewall rules. Placing the letter 'n' in front of 'eq' means 'not equal to,' so anything not equal to 'allow' is displayed, which is any denied traffic.

Combining Traffic Filter Examples

All Traffic From Zone Outside And Network 10.10.10.0/24 TO Host Address 20.20.20.21 In The Protect Zone:

      example:    (zone.src eq OUTSIDE) and (addr.src in 10.10.10.0/24) and (addr.dst in 20.20.20.21) and (zone.dst eq PROTECT)


All Traffic From Host 1.2.3.4 to Host 5.6.7.8 For The Time Range 8/30/2015 -08/31/2015

   example:       (addr.src in 1.2.3.4) and (addr.dst in 5.6.7.8) and (receive_time geq '2015/08/30 00:00:00') and (receive_time leq '2015/08/31 23:59:59')


Read More...

Upgrade OS in Palo alto

STEP 1 Take Backup 

1. Select Device > Setup > Operations and Export "Export named configuration snapshot."
2. Select the XML file that contains your running configuration (for example, running-config.xml) and click OK to export the configuration file.
3. Save the exported file to a location external to the firewall. You can use this backup to restore the configuration if you have problems with the upgrade.

STEP 2 : Make sure the firewall is running content release needed for the installation of required OS 

1.Select Device > Dynamic Updates.
2.If the firewall is not running the minimum required update, Check Now to retrieve a list of available updates.
4.Locate and Download the appropriate update.
5.After the download completes, Install the update.

STEP 3: Determine the upgrade path.

1.Select Device > Software > Check now for the latest update
2.Locate and Download the version to which you intend to upgrade.
3.After the download completes, Install the update.
4.After the installation successfully completes, reboot using one of the following methods:
If you are prompted to reboot, click Yes.
If you are not prompted to reboot, select Device > Setup > Operations and Reboot Device (Device Operations section).

NOTE : You cannot skip installation of any major releases in the path to your target PAN-OS version. Therefore, if you intend to upgrade to a version that is more than one major release away, you must still download, install, and reboot the firewall for each intermediate major release along the upgrade path.

For example, if you want to upgrade from PAN-OS 6.0.11 to PAN-OS 7.1.5, you must:

Download and install PAN-OS 6.1.0 and reboot.
Download and install PAN-OS 7.0.1 and reboot (7.0.1 is the base image for the 7.0 release, not 7.0.0).
Download PAN-OS 7.1.0 (you do not need to install it).
Download and install PAN-OS 7.1.5 and reboot.

STEP 4: Verify that the firewall is passing traffic. Select Monitor > Session Browser.
Read More...

Factory Reset PaloAlto

Factory Reset PaloAlto

STEPS:

Connect to console port of PaloAlto device using Putty

Power on to reboot the device.
During the boot sequence, the screen should look like this:


Type maint to enter maintenance mode.


you will see a "CHOOSE PANOS" screen with the following options: PANOS (maint-other), PANOS (maint) or PANOS (sysroot0).
Please choose PANOS (maint). Press enter to continue.


Once in maintenance mode, the following is displayed, please press enter to Continue:


Arrow down to Factory Reset and press Enter to display the menu:


You will see the Image that will be used to perform the factory reset. Select Factory Reset and press Enter again:


Choose and select reboot when factory reset process is success.

NOTE: Please note that once reboot is complete you have to wait around 15 minutes login with default credentials in CLI .If you try immediately with default credentials it will be showing invalid credentials.so please wait...

default username : admin
default password : admin

You can verify everything is set to default by logging to web portal https://192.168.1.1 using the default credentials


Read More...

Register and activate licenses in Palo Alto firewall

Register the Firewall

STEP 1 Log in to the web interface of the firewall (https://<IP address>)
STEP 2 copy serial number of device from the General Information section of the Dashboard screen

STEP 3 Go to https://support.paloaltonetworks.com
STEP 4 Register and verify the email 

Note : To register, you must provide your sales order number or customer ID, and the serial number of your firewall (which you can paste from your clipboard) or the authorization code you received with your order. You will also be prompted to set up a username and password for access to the Palo Alto Networks support community.
STEP 5 : Once email is verified,login to https://support.paloaltonetworks.com using the email address and password
STEP 6 : You will be prompted to choose two security questions and answers to use if you forget the password.
STEP 7 : Register new device by going to Asset tab > Devices > Register new device and fill the details needed


Activate Licenses and Subscriptions

STEP 1 : Locate the activation codes for the licenses you purchased from the registered email address you have provided while purchasing device.If you cannot locate this email, contact customer support to obtain your activation codes before you proceed.
STEP 2 : Launch the web interface and go to Device > Licenses
STEP 3 : Activate each license you purchased either by following method
Retrieve license keys from license server —Use this option if you activated your license on the support portal. 

Activate feature using authorization code —Use this option to enable purchased subscriptions using an authorization code for licenses that have not been previously activated on the support portal. When prompted, enter the Authorization Code and then click OK.


Manually upload license key —Use this option if your device does not connected to internet. In this case, you must download a license key file from the support site on an Internet connected computer and then upload to the device.
STEP 4 : Verify that the license was successfully activated from Device > Licenses .You can see the issue and expiry date of the licenses here once its activated
STEP 5 : (WildFire subscriptions only) Perform a commit to complete WildFire subscription activation.

Read More...

Filtering logs in monitoring tab of Palo Alto

One of the best feature I loved in NGFW palo alto network is its search functionality .By default all log files are generated and stored locally on the firewall .

Filtering of traffic in monitor tab of paloalto helps us to find many things including
1.whether a traffic is getting allowed or denied
2.To filter traffic based on host, zone, port, action etc
3.To filter traffic between a specified time
4.Filter traffic from a particular user
5.Filter traffic to or from a specific IP /Network /Zone

In some cases we should have successfully created the policy in PaloAlto but we may forget to add the needed port in  that rule.When a user is complaining that he is not able to access a particular service in a  particular server we can easily figure out whats going on by reviewing the logs in monitoring tab of PaloAlto.

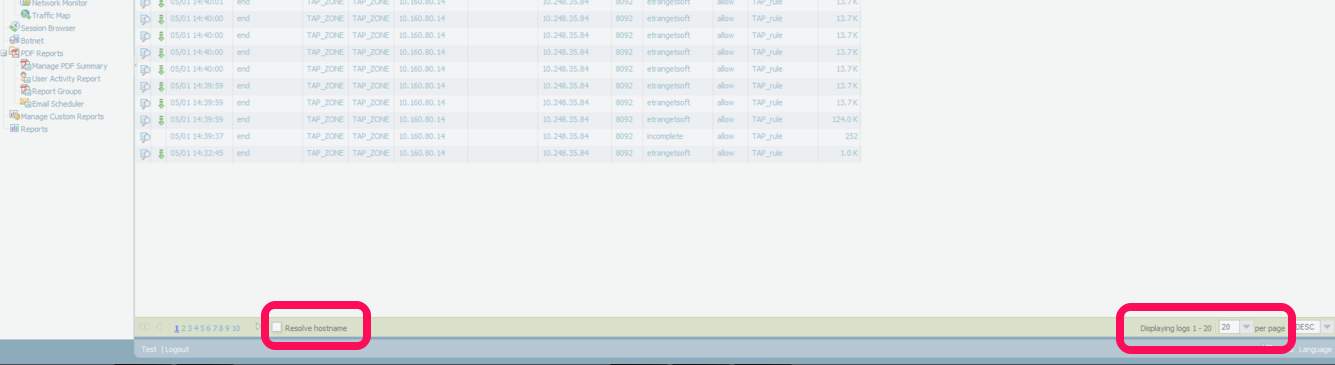
Login to PaloAlto and Goto Monitor > Traffic(left tab).There you can see the traffic flow .To change the automatic refresh interval, select an interval from the drop-down (1 min, 30 seconds, 10 seconds,or Manual).

To change the number of log entries per page, select the number of rows from the Rows drop-down

Select the Resolve Hostname check box to begin resolving external IP addresses to domain names.


To filter traffic from source 

1.Click on any IP in the source field
2.It will automatically add addr.src in x.x.x.x in the filter bar. eg (addr.src in 10.160.80.14) 
3.Press ENTER.
4.It will show all the traffic generating from 10.160.80.14
5.Edit IP as per your need.


Some other examples

Destination Filter: (addr.dst in 192.168.2.6) - shows all traffic with a destination address of a host that matches 192.168.2.6
Filter a source network : ( addr.src in 192.168.10.0/24 ) - shows all traffic from network  192.168.10.0/24
Filter a destination network : (addr.dst in 192.168.10.0/24)  - shows all traffic to network  192.168.10.0/24

Filter using Source and Destination

(addr.src in 1.1.1.1) AND (addr.dst in 2.2.2.2) - shows all traffic coming from a host with an IP address of 1.1.1.1 and going to a host destination address of 2.2.2.2

Filter for source OR destination

(addr in 1.1.1.1) - Shows all traffic with a source OR destination address of a host that matches 1.1.1.1

Zone Traffic Filter Examples 

FROM ZONE TRUST

(zone.src eq TRUST) - shows all traffic coming from the TRUST zone

TO ZONE UNTRUST

(zone.dst eq UNTRUST) - shows all traffic going out the UNTRUST zone

(zone.src eq TRUST) and (zone.dst eq UNTRUST) - shows all traffic traveling from the TRUST zone and going out the through UNTRUST

PORT Traffic Filter Examples

FROM PORT 22

(port.src eq 22)- shows all traffic traveling from source port 22

TO PORT 80

(port.dst eq 80)- shows all traffic traveling to destination port 80

Allowed/Denied Traffic Filter Examples 

 ALL TRAFFIC THAT HAS BEEN ALLOWED BY THE FIREWALL RULES

(action eq allow) 
OR
(action neq deny)

Example: (action eq allow)- Shows all traffic allowed by the firewall rules.

NOTE: Placing the letter 'n' in front of 'eq' means 'not equal to,' so anything not equal to 'deny' is displayed, which is any allowed traffic.

ALL TRAFFIC DENIED BY THE FIREWALL RULES

(action eq deny)
OR
(action neq allow)

Example: (action eq deny) - Shows all traffic denied by the firewall rules.

NOTE: Placing the letter 'n' in front of 'eq' means 'not equal to,' so anything not equal to 'allow' is displayed, which is any denied traffic.

TRAFFIC from a particular user

(user.src eq 'Sysnet\Shabeer') - Shows traffic from that particular user [Sysnet is domain and shabeer is username]

Combining Traffic Filter Examples

Show denied traffic from SOURCE 123.24.10.23 

(addr.src in 123.24.10.23 ) and (action eq deny)

Allowed TRAFFIC FROM SOURCE 11.10.21.21 to DESTINATION ADDRESS 20.20.20.56 in PORT 80

(addr.src in 11.10.21.21) and (addr.dst in 20.20.20.56) and (port.dst eq 80) and (action eq allow)

ALL TRAFFIC FROM ZONE DEVELOPMENT AND SOURCE NETWORK 11.10.21.0/24 TO DESTINATION ADDRESS 20.20.20.21 IN THE SECURITY ZONE:

(zone.src eq DEVELOPMENT) and (addr.src in 11.10.21.0/24) and (addr.dst in 20.20.20.21) and (zone.dst eq SECURITY) 

NOTE : You don't need to remember any of the filters mentioned above.Its very simple to create even complex filters .You can simply click the needed criteria on the logs and it will automatically add to the filtering.You just need to edit the particular zone/IP address/Port number or Action

For example
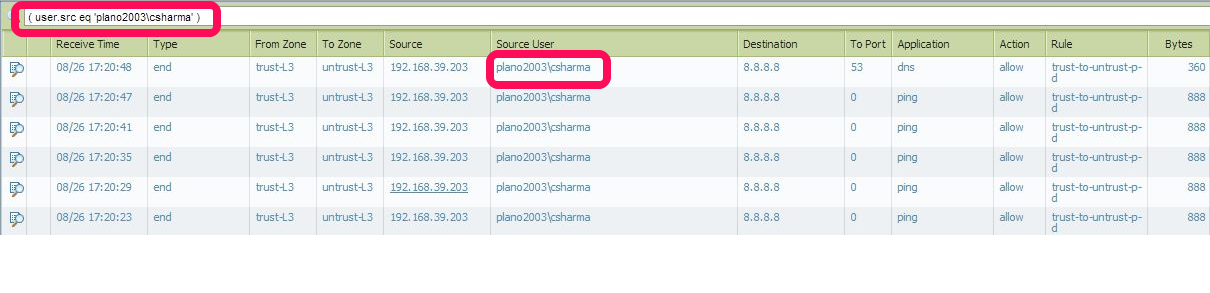
Below screenshot shows traffic from user plano2003\csharma. If you want to search custom user all you need to do is to
1. Click on any user below "Source user"  here it is (user.src eq 'plano2003\csharma')
2.Then it will add(user.src eq 'plano2003\csharma') to the filter bar. edit it with your custom username
Conclusion
1.To create a filter go to Monitor > Traffic
2. Just CLICK on the custom field you need to make a filter ie click on any field under From Zone / To Zone / Source / Source user / Destination / To port / Application / Action .In the above example we create filter using source user
3.Edit the IP/ZONE/PORT/ACTION as per your need
4..Press ENTER and it will show the custom traffic you need to see.
Read More...

Palo Alto Network NGFW Architecture

Next Generation firewalls does much more duties than a legacy firewalls which  lncludes firewall policy, URL Filtering, IPS, Antivirus,Anti-spyware,file blocking,wildfire etc. .This results in  consuming a lot of Firewall hardware resources like CPU consumption, or memory utilization.

To overcome such situations Palo Alto Networks next-generation firewalls are build based on a unique Single Pass Parallel Processing (SP3) Architecture .This combines two components:
  • Single Pass software
  • Parallel Processing hardware


The SP3 architecture is a unique approach to hardware and software integration that simplifies management, streamlines processing and maximizes performance

The combination of Single Pass software and Parallel Processing hardware is completely unique in network security, and enables Palo Alto Networks next-generation firewalls to restore visibility and control to enterprise networks at very high levels of performance.


The Control Plane has its own dual core processor, RAM, and hard drive. This processor is responsible for tasks such as management Ul, configuration, logging, and reporting.

The Data Plane contains three types of processors :
  • Signature Match Processor: Performs vulnerability and virus detection
  • Security Processors: Multi-core processors, which handle security tasks such as SSL decryption
  • Network Processor: Responsible for routing, NAT, and network layer communication

How packet flow in Palo Alto Firewall?

Basic:

Initial Packet Processing —-> Security Pre-Policy —-> Application —-> Security Policy —-> Post Policy Processing

Advance:

Read More...

How to view the details of Threats / attacks in PaloAlto Firewall

In PaloAlto, by default all log files are generated and stored locally on the firewall 

To view the details of Threats Goto Monitor tab > Threats

Each entry includes the date and time, a threat name or URL, the source and destination zones, addresses, and ports, the application name,and the alarm action (allow or block) and severity.

Threat tab Displays an entry when traffic matches a Security Profile (Antivirus, Anti-Spyware,Vulnerability, URL Filtering, File Blocking, Data Filtering, or DoS Protection) that is attached to a security rule on the firewall. 

The Type column indicates the type of threat, such as “virus” or “spyware.” The Name column is the threat description or URL

To view all the traffic from attackers IP .Go to Monitor tab > Traffic and in filter bar give the attackers IP as source address in the format (addr.src in 202.103.52.147) and press ENTER. It will show all the traffic from that IP.


Read More...

General settings in PaloAlto Firewall

Setup Hostname and Login Banner.


1. Select Device > Setup > Management and edit the General Settings.
2. Enter a Hostname for the firewall and enter your network Domain name. The domain name is just a label; it will not be used to join the domain.
3. Enter Login Banner text that informs users who are attempting to log in that they are that they must have authorization to access the firewall management functions.

Setup DNS


Select Device > Setup > Services.
1. On the Services tab, Enter Primary and secondary DNS
2. For Update Server, enter the IP address or host name of the server from which to download updates from Palo Alto Networks. The current value is updates.paloaltonetworks.com. Do not change the Update Server unless instructed by Technical Support.

NOTE : You must manually configure at least one DNS server on the firewall or it will not be able to resolve hostnames; it will not use DNS server settings from another source, such as an ISP.

Setup a secure password for the admin account.


1. Select Device > Administrators.
2. Select the admin role.
3. Enter the current default password and the new password.
4. Click OK to save your settings.

 Service Route Configuration


By default, the firewall uses management interface to communicate to various servers including DNS, Email, Palo Alto Updates, User-ID agent, Syslog, Panorama  etc. Service routes are used so that the communication between the firewall and servers go through the dataplane.

 To change this Go to Device > Setup > Services > Service Route Configuration and configure the appropriate service routes

As always dont forget to COMMIT the changes

Reboot or Shutdown PAN device


Go to Device > Setup >Operations>Device Operations
From here you can reboot or shutdown PAN device

Read More...

Initial Configuration of PaloAlto Network Firewall

By default, the firewall has an IP address of 192.168.1.1

First step we need to do is to assign a IP in the range 192.168.1.X to our machine which is going to connect to PAN device


Once the IP is configured ,Connect our machine to the PAN management Interface using a RJ-45 cable

From a browser, go to https://192.168.1.1 

Add security exception


Once you get the login page ,Give username : admin ,Password : admin


Once credentials are given you will be login to the PAN device


We will be notified that we should change our credentials, which we need do in a later step:
Once you are able to login,You can get the default page like below

This page is customized  using widgets .We can drag or drop widgets as per our desire

Setup Management IP address

1. Select Device Tab> Setup > Management and then edit the Management Interface Settings.

2. Enter the IP Address, Netmask,

To prevent unauthorized access to the managementinterface, it is a best practice to Add the Permitted IP Addresses from which an administrator can access the
MGT interface. [Optional]
3. Select which management services to allow on the interface.Make sure Telnet and HTTP are NOT selected because these services use plain text and are not as secure as the other services and could compromise administrator
credentials.

5. Click OK

6. To complete this we need to make sure we COMMIT the changes.For this we need to click the commit button at the right top of the screen

Once you click on that you will get a pop-up 
.
Click OK for that
 

You may be noticing that while changing the management it wont be getting to 100%.This is because the old IP 192.168.1.1 is changed to the new

You can type the new IP https://x.x.x.x.x in the new browser and you can access the web console again
Read More...